Sunday, July 31, 2011

Send automatic predefined input variable parameters to a script called by another script in bash through command line prompt

If you want to run a bash script inside a bash script to automate it, but the inside bash script asks and waits for a keyboard input variable from the user to proceed, this tip will become handy.

$ ./your_bash_script1.sh
Welcome to the XYZ script
Would you like to rewrite the output files? Please input Y for yes or N for no
Now script waits for Y or N input from user. i.e you have to input Y or N to proceed. So if you want to put these script inside another bash script, you would have to enter is as many times and it asks. How to automate a predefined input, say Y, to it and sit lazy while the script does everything by itself and finishes off?. Try echo piping

#!/bin/bash
#Send automatic predefined input variable parameter to a script called by another script
#in bash through command line prompt in Linux.linux bash through command prompt
echo "Y" | ./your_bash_script1.sh
echo "N" | ./your_bash_script2.sh

This will take 'Y' as the user input for 'your_bash_script1.sh' and N for your_bash_script2.sh

Saturday, July 30, 2011

Share Windows 7 host files to Linux VMWare guest OS using Samba

If you have a Linux guest running on a Windows host, you may want to share the Windows drive to Linux. This way you can work more efficiently by keeping a single copy of files to work on both windows and linux; no file redundancy, no wastage of HDD space and no more copy paste between the OS's.  (You can mount not only the Windows host but also any Windows shared folders in your network by this method; Just put the IP address of the network Windows machine instead of the host IP.)

My settings:
Dell XPS 15z laptop with Windows 7 Home premium installed
OpenSUSE 11.4 64bit installed as guest VMware virtual OS (NAT network)

I want:
To share D: drive of Windows host on OpenSUSE Linux guest with full read write access. I should be able to delete/move/rename any files in D: drive on Linux as a Linux user(You may not want to do that for your C: drive Windows system files)

Part A: Prerequisite
1) An administrative Windows host user account (eg. user name= "YourWindowsHostUserName")

2) Shared windows folder with read-write permission: If you want to have full access to the windows files on Linux.(delete/move/rename)

Right click on the Windows folder/drive (D:\) > Properties > Sharing > Advanced Sharing >
a) Check sharing, give a name (eg. WindowsD) for the shared folder (This name will be used in Linux command later)
b) On permissions add the user; search for your user name in the panel; add it and give Full permission.


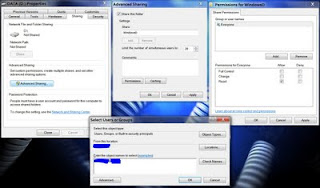
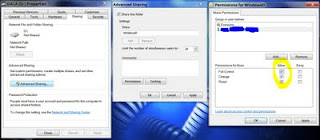
c) Now when go to Computer > Network you should be able to see a shared directory "WindowsD"

3) IP address of your Windows host:
a) Open windows command shell; (Windows Start menu > Programs > Accessories > Command Prompt)
b) Type 'ipconfig' without quotes. You can see an IP address like '192.168.?.?' if you are on a LAN. You will use this IP address in Linux mount command later.

4) Samba package installed on the Linux guest: Go to Yast and search for samba modules. If not installed, install them.(I'm not sure which one specifically)


PART B: Enable sharing in Guest Linux
1) Log into your user account in Linux VMware guest
2) Create a directory where you want to mount your windows files to (eg. /home/YourUserName/winD)
3) Open terminal and check whether you can connect to the Windows by ping

  ping 192.168.?.?

You will see the reply if it is connected.
4) Now you are ready to mount: Type the mount command:

sudo mount -t cifs -o username=YourWindowsHostUserName,password=YourWinodwsHostUserPassword,uid=YourLinuxGuestUserName,gid=users //192.168.?.?/WindowsD /home/YourLinuxUserName/winD

(all in one line)
You can leave the password option out. Then the windows login password will be asked in the prompt.

5) Now yow should be able to see the Windows D drive files in winD directory in you home. You will be able to delete/rename/move files with full control. (Be careful, delete will go to Linux trash, not windows Recycle bin; well, you know that)

Part C: Make this permanent to the system

If the mounting is successful you can make this permanent so that the files will be mounted on booting Linux guest. i.e, You don't need to mount it every time you log in and need to use the shared Windows directory.

1) Check whether cifs service is running on linux
Yast > System > System Services (Runlevel) and make sure that the service 'cifs' is enabled. If not, enable it.

2) Add the following line to /etc/fstab as root

//192.168.?.?/WindowsD /home/YourLinuxGuestUserName/winD cifs username=YourWindowsHostUserName,password=YourWinodwsHostUserPassword,uid=YourLinuxGuestUserName,gid=users,_netdev 0 0


(all in one line)

3) Now when you boot the next time, you should see the windows files on winD on your home directory

4) If you don't want to display the password in fstab do the following

a) Create a login credential file as root; eg: /etc/.smblogincredentials
b) Add the following lines to the file

username=YourWindowsHostUserName
password=YourWindowsHostUserPassword

c) Change the permission so that other users won't be able to read it.

chmod go-rwx /etc/.smblogincredentials

May be there is another easy way, but this is not that hard and works well for me so far. Hope this helped you in some way. Visit the reference web pages given below for more detailed explanations and options.


___________________________________________________________________
Reference and useful web links:
1) Samba HowTo: Mount a CIFS Network Share [Mapped Drive] in openSUSE
http://opensuse.swerdna.org/susesambacifs.html
PS: That is an excellent How-To tutorial.

2) Access Windows Shares in Linux
http://www.kernelhardware.org/access-windows-shares-in-linux/


3) VMWare community discussions
http://communities.vmware.com/message/1428672
http://communities.vmware.com/thread/293974
http://communities.vmware.com/thread/298342


4) Some old info
Share files/folders from Windows to Linux on VMWare
http://onlineappsdba.com/index.php/2008/09/07/share-filesfolders-from-windows-to-linux-on-vmware/


Sharing Files Between Guest and Host Operating Systems
http://www.vmware.com/support/ws3/doc/ws32_running9.html

Monday, July 11, 2011

Real speed tests for your internet connection: Do you get the speed your ISP promises?

To test the actual browsing bandwidth you get, you many need to test with multiple website speed meters.


Popular one is Speedtest.net
http://www.speedtest.net

If you just use the popular ones, your ISP may fool you. So use the below ones too
http://www.speakeasy.net/speedtest

This one is interesting since it loads images from all over the world to simulate your real browsing
http://www.numion.com/YourSpeed3/index.html


This one is for VoIP quality testing for your internet speed
http://myspeed.visualware.com/index.php


http://www.dslreports.com/speedtest

http://www.auditmypc.com/broadband-speed-test.asp

http://performance.toast.net

http://www.ip-adress.com/speedtest

http://www.internetfrog.com/mypc/speedtest

CNET internet download speedtest
http://reviews.cnet.com/internet-speed-test

Tuesday, July 5, 2011

Keep a window always visible on top of other windows

In Linux KDE this function is built-in: Right click on any Window title > Advanced > Keep above others

In Windows, this feature does not come shipped from factory. You need a 3rd party tool. This small program is useful.

http://dl.dropbox.com/u/149566/Downloads/always-on-top.zip
Download, extract the executable and double-click; it'll now be visible in the system tray as an icon. Go to your window you want to make visible and use key combo Ctr+Space to enable/disable that widow to be always on top.

Together with WizMouse, this option is quite useful and will increase your productivity working with multiple documents at the same time. Viewing and comparing two large documents or spreadsheets  becomes much efficient. 

More details on the reference webpages below

____Reference Web Links______________________________________________

Always on Top: Keep Any Window Visible Always
http://www.labnol.org/software/tutorials/keep-window-always-on-top/5213/
 
WizMouse causes your mouse wheel to scroll the window under the mouse pointer instead of the currently focused window. You don't have to click on a window to focus it before you're able to scroll it with the mouse wheel.

Create a directory with current date and time as name using a single command

Linux bash command for creating a directory with current date and time.

mkdir `date +%Y%m%d%H%M%S`
 
This will make a directory in the working directory with year, month, day, hour, minute and second. Add alias in .bashrc file

alias mdr="mkdir `date +%Y%m%d%H%M%S`"

Monday, July 4, 2011

XPS 15z: 'Dedicated' Multmedia buttons

If you use multimedia buttons more often that Function keys, you have the option to make dedicated multimedia buttons in Dell XPS 15z. Thus you can change the volume, play/pause, mute, change brightness etc in a single button use. If and when you want to use function keys as such; for example full screen in browser (F11), use Fn + the desired function key.

Control panel > Windows Mobility Center (or use Windows Key + X). Then change the 'Function Key Row' option drop down menu and change it to Multimedia key.

Saturday, July 2, 2011

XPS 15z: Factory reset, recovery and partitions

Updated on Feb 2nd 2012:

Dell XPS 15z from factory ships with the following partitions (as in the order data written from the disc beginning to end)
  • A hidden OEM partition of 102 MB (less than 1 MB used)
  • A hidden recovery partition of around 15 GB (~ 8 GB used; contain the factory image of the Windows installation)
  • Windows installed into C: drive

Once the XPS 15z system is booted up and configured for the first time, there is an option to burn recovery disc(s) with Dell DataSafe Local Backup basic edition. You do not need these discs to reset the laptop to the factory setting as long as you do not format the entire hard disc thus erasing the recovery partitions. Even if you do not plan to clean format the entire hard disc, this "recovery disc burning exercise" might becomes handy in one scenario; a catastrophic hard disc failure. The factory image saved into the HDD recovery partition could be permanently lost in such an unfortunate event. So better burn them and keep it somewhere in the shelf. If you use normal DVD's, you would need two DVD's to make the usable recovery disc set.(Total ~8GB) Remember to not to stop the burning in one disc. If you have a dual layer DVD, you can burn into one single disk. It's a pity that Dell does not ship a system recovery disc to the customers, which would cost them only a tiniest of tiny fraction of the money customers spend on the laptop purchase. But I assume it may not be the economic reason behind it. Now what does that small OEM partition do? That 102 MB Dell OEM hidden partition contains the Dell diagnostics utilities/tools. These software is available from the boot through keyboard F12.

How to reset XPS 15z to original fresh factory install state?

I wanted to test the Dell factory restore options and this is how I tried and tested it.


  • Keep pressing F8 continuously on boot and you should see a ‘Repair Windows’ option along with many other options like Safe mode etc. 
  • If you chose that, ‘Windows is loading files..’ progress bar will be shown followed with ‘Starting Windows’ animation. 
  • Then you select the keyboard, login with the username/password and at the end you should see the Windows advanced repair options. 
  • At the bottom, you can see the Dell Datasafe Backup. Click that and you’ll enter into the software options. You can see a factory image there.
  • Follow the simple instructions and you can restore the laptop to factory fresh state.

In certain abnormal cases (when the recovery environment is messed-up), the process could be different. This happened to me once.

When you press F8 on boot, a scanning window with a message "Your computer was unable to start" will appear

"Attempting repairs" took some 10 minutes.

Startup repair cannot repair automatically

Don't send

Advanced options

Login to admin by selecting keyboard (US) and then dropdown menu to select your username > password > login

Last option> Dell DataSafe Restore and Emergency Backup

Restore my system > Factory image (with the date)

This will format C drive and reinstall the factory image from the hidden 15 GB recovery partition.

This took 20 minutes

_____________________________________________________________________________
This link might be helpful
Restoring Your Dell Computer to Original Factory Installation with Dell DataSafe Local Backup 2.0 | Dell
http://support.dell.com/support/topics/global.aspx/support/kcs/document?&docid=DSN_353562&isLegacy=true